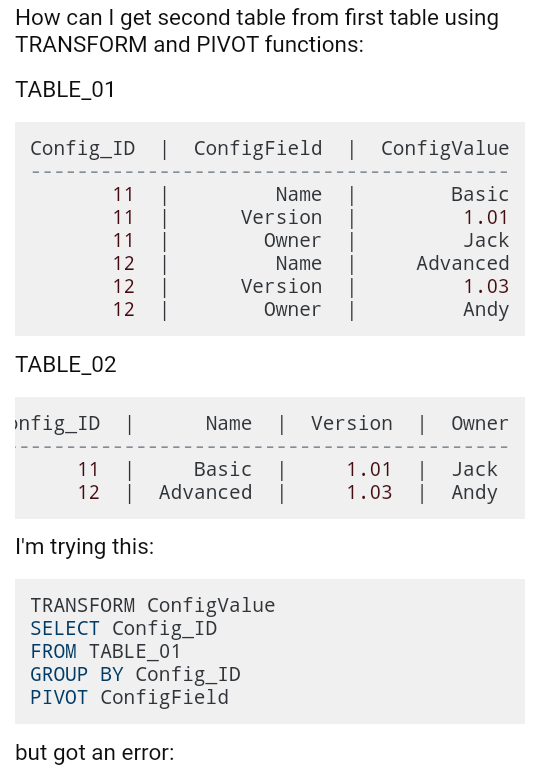
کلینیک فوق تخصصی اکسس ( کاربرد vba در اکسس )
به اشتراک گذاری اطلاعات کسب شده در اکسس از سایت آفیس و سایت های تخصصی خارجیکلینیک فوق تخصصی اکسس ( کاربرد vba در اکسس )
به اشتراک گذاری اطلاعات کسب شده در اکسس از سایت آفیس و سایت های تخصصی خارجیدرباره من
 This topic is a little part of programming in access , We have reached to this goal just with efforts and more exercises also studying the Microsoft Office Documents and their various forums
ادامه...
This topic is a little part of programming in access , We have reached to this goal just with efforts and more exercises also studying the Microsoft Office Documents and their various forums
ادامه...
RC4
Function fRunRC4(sMessage, strKey) As String Dim kLen, x, y, i, j, temp Dim s(256), k(256)
'Init keystream
End Function
آموزش VBA در اکسس
تاریخ اعمال ۶اسفند ۹۹ و تاریخ اعتبار قیمت ۳ ماه
خصوصی ساعتی 250
گروهی ساعتی 200
درصورت درخواست در نظرات قید گردد
اعتبار به پایان رسید لطفا از طریق کتاب های آموزشی اقدام نمائید و سعی کنید به VB6 یا VB.NET شیفت کنید ACCESS قابل اطمینان نیست.
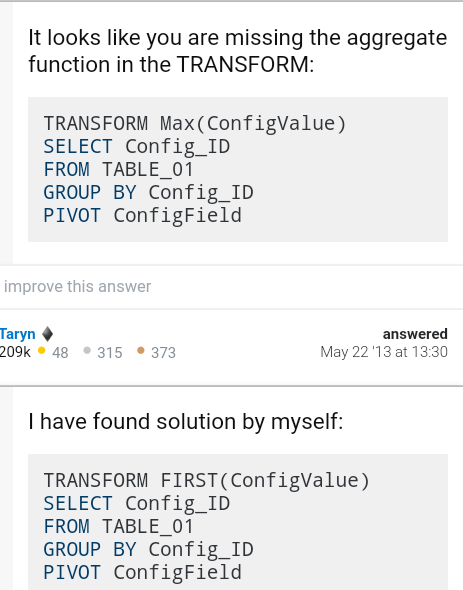
شرح بارکد 128 به زبان ساده
نوارهای عمودی مشکی در شکل زیر بعنوان Bar یاد شده و نوارسفید بعنوان Space
این بارکد ۷ سکشن دارد
۱-منطقه فراخ Quiet Zone
۲-نماد شروع Start Symbol
۳-کد کردن داده Encode Data
۴-نماد بررسی یا چک سیمبل و الزامیست Check Symbol
۵-نماد پایان Stop Symbol
۱-منطقه فرخ Quiet Zone
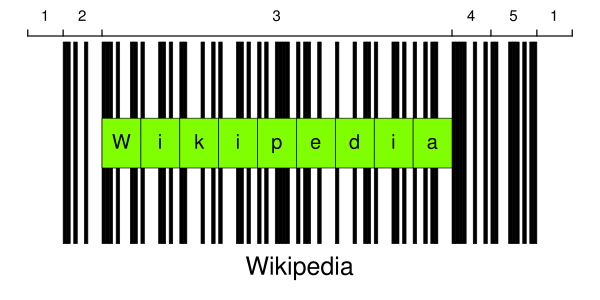
نماد بررسی یا چک سیمبل از جمع حاصلضربهای Value هر کاراکتر در شماره ترتیب آن بدست می آید .
کد ۱۲۸ شامل ۱۰۸ نماد است : ۱۰۳ نماد داده ۳ نماد شروع و ۲ نماد پایان ( طبق جدول ) . هر نماد حاوی ۳ میله سیاه و ۳ میله سفید با عرض های متفاوت است . هر میله و فضای خالی ۱ تا ۴ واحد پهنا دارد. جمع عرض های ۳ میله سیاه و ۳ میله سفید ۱۱ واحد یا ماژول هستند .
حداقل عرض Quiet Zone در سمت چپ و راست بارکد 10x است، x حداقل عرض ماژول است و وجودش در سمت چپ و راست بارکد کاملا اجباری است
هر Symbol در بارکد از ۳ میله ( Bar ) و ۳ فاصله یا فضای خالی ( Space) تشکیل شده است ، هر میله یا فاصله ۱ ۲ ۳ یا ۴ واحد پهنا دارد. جمع عرض میله ها باید زوج باشد ( ۴ ۶ یا ۸ ) . جمع عرض فاصله ها بایستی فرد باشد ( ۳ ۵ یا ۷ ) و در کل ۱۱ واحد در هر Symbol
برای مثال رمزنگاری اسکی کاراکتر ۰ میتواند بعنوان 10011101100 ( مطابق جدول ) نمایش داده شود جایی که رشته 1 یک بار است و 0 هم یک فاصله . 1 اگر تک باشد بعنوان نازک ترین خط در بارکد است و ۳ تا 1 نشان میدهد ۳ برابر یک بار ضحامت دارد بدین معنا که ضخیم تر از آن است
جدول Symbol ها ستون ویدز و پترن Code_128
تصویر زیر بیانگر توضیحات بالاست ( AB )

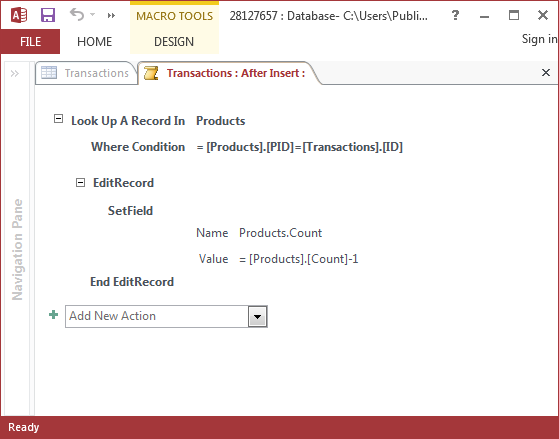

SetLocalVar
این اکشن یک متغیر موقت میسازد و آن را به یک مقدار مشخص تنظیم می نماید
متغیرهایی که توسط این اکشن ساخته میشوند فقط در ماکرو میتوانند استفاده شوند . در غیر از ماکرو در Event ، فرم یا گزارش از اکشن SetTempVar استفاده بنمائید .
زمانیکه متغیر موقت ساخته شدشما می توانید آنرا به یک Expression ارجاع بدهید. برای مثال اگر متغیرموقتی با نام TotalAmount ایجادکردید با استفاده از نوشتار زیر می توانید از متغیر بعنوان منبع کنترل یک Text Box استفاده بنمائید
LocalVars!TotalAmount=
در یک Data Macro ، لازم نیست از مجموعه LocalVars استفاده کنید تا به یک متغیر مراجعه کنید. به عنوان مثال ، اگر یک متغیر موقت را در یک Macro Data با نام TotalAmount ایجاد کردید ، می توانید از متغیر به عنوان منبع کنترل یک جعبه متن با استفاده از نحو زیر استفاده کنید: [TotalAmount]=ImageProcess Object
زنجیره فیلتر را مدیریت می کند. یک شی ImageProcess را می توان با استفاده از "WIA.ImageProcess" به عنوان ProgID در فراخوانی به CreatObject ایجاد کرد.مثال Image Resize
Dim Thumb 'As ImageFile
---------------------
شامل مجموعه ای از همه اشیاء FilterInfo موجود است. برای جزئیات بیشتر در مورد دسترسی به شی FilterInfos ، از ویژگی FilterInfos (ImageProcess) در شی ImageProcess دیدن کنید.
To get further documentation for ImageProcess, we can just "ask it"! Run this:
()Sub List_WIA_ImageProcess_Filters Dim f As Object, x As Long For Each f In CreateObject("WIA.ImageProcess").FilterInfos x = x + 1 Debug.Print "#" &x &": " &f.Name &" = " &f.Description &vbLf Next fEnd Sub
RotateFlip = Rotates in 90 degree increments and Flips, horizontally or vertically.
RotationAngle - Set the RotationAngle property to 90, 180, or 270 if you wish to rotate, otherwise 0 [the default]FlipHorizontal - Set the FlipHorizontal property to True if you wish to flip the image horizontally, otherwise False [the default]FlipVertical - Set the FlipVertical property to True if you wish to flip the image vertically, otherwise False [the default]FrameIndex - Set the FrameIndex property to the index of a frame if you wish to modify a frame other than the ActiveFrame, otherwise 0 [the default]
Crop = Crops the image by the specified Left, Top, Right, and Bottom margins.
Left - Set the Left property to the left margin (in pixels) if you wish to crop along the left, otherwise 0 [the default]Top - Set the Top property to the top margin (in pixels) if you wish to crop along the top, otherwise 0 [the default]Right - Set the Right property to the right margin (in pixels) if you wish to crop along the right, otherwise 0 [the default]Bottom - Set the Bottom property to the bottom margin (in pixels) if you wish to crop along the bottom, otherwise 0 [the default]FrameIndex - Set the FrameIndex property to the index of a frame if you wish to modify a frame other than the ActiveFrame, otherwise 0 [the default]
Scale = Scales image to the specified Maximum Width and Maximum Height preservingAspect Ratio if necessary.
MaximumWidth - Set the MaximumWidth property to the width (in pixels) that you wish to scale the image to.MaximumHeight - Set the MaximumHeight property to the height (in pixels) that you wish to scale the image to.PreserveAspectRatio - Set the PreserveAspectRatio property to True [the default] if you wish to maintain the current aspect ration of the image, otherwise False and the image will be stretched to the MaximumWidth and MaximumHeightFrameIndex - Set the FrameIndex property to the index of a frame if you wish to modify a frame other than the ActiveFrame, otherwise 0 [the default]
Stamp = Stamps the specified ImageFile at the specified Left and Top coordinates.
ImageFile - Set the ImageFile property to the ImageFile object that you wish to stampLeft - Set the Left property to the offset from the left (in pixels) that you wish to stamp the ImageFile at [default is 0]Top - Set the Top property to the offset from the top (in pixels) that you wish to stamp the ImageFile at [default is 0]FrameIndex - Set the FrameIndex property to the index of a frame if you wish to modify a frame other than the ActiveFrame, otherwise 0 [the default]
Exif = Adds/Removes the specified Exif Property.
Remove - Set the Remove property to True if you wish to remove the specified Exif property, otherwise False [the default] to add the specified exif propertyID - Set the ID property to the PropertyID you wish to Add or RemoveType - Set the Type property to indicate the WiaImagePropertyType of the Exif property you wish to Add (ignored for Remove)Value - Set the Value property to the Value of the Exif property you wish to Add (ignored for Remove)FrameIndex - Set the FrameIndex property to the index of a frame if you wish to modify a frame other than the ActiveFrame, otherwise 0 [the default]
#6: Frame = Adds/Removes the specified Frame.
Remove - Set the Remove property to True if you wish to remove the specified FrameIndex, otherwise False [the default] to Insert the ImageFile before the specified FrameIndexImageFile - Set the ImageFile property to the ImageFile object whose ActiveFrame that you wish to add (ignored for Remove)FrameIndex - For Remove, set the FrameIndex property to the index of the frame you wish to remove, otherwise for add, set the FrameIndex to the index of the frame to insert the ImageFile before, otherwise 0 [the default] to append a frame from the ImageFile specified
#7: ARGB = Updates the image bits with those specified.
ARGBData - Set the ARGBData property to the Vector of Longs that represent the ARGB data for the specified FrameIndex (the width and height must match)FrameIndex - Set the FrameIndex property to the index of the frame whose ARGB data you wish to modify, otherwise 0 [the default] to modify the ActiveFrame
#8: Convert = Converts the resulting ImageFile to the specified type.
FormatID - Set the FormatID property to the supported raster image format desired, currently you can choose from wiaFormatBMP, wiaFormatPNG, wiaFormatGIF, wiaFormatJPEG, or wiaFormatTIFFQuality - For a JPEG file, set the Quality property to any value from 1 to 100 [the default] to specify quality of JPEG compressionCompression - For a TIFF file, set the Compression property to CCITT3, CCITT4, RLE or Uncompressed to specify the compression scheme, otherwise LZW [the default]
CommonDialog.ShowAcquireImage method
یک یا چند کادر گفتگو را نمایش می دهد که به کاربر امکان می دهد تصویری از یک دستگاه سخت افزاری را بدست آورد
CommonDialog object
شامل تمام روشهایی است که یک رابط کاربر را نمایش می دهد. کنترل CommonDialog یک کنترل در زمان اجرا نامرئی است که می توانید با استفاده از "WIA.CommonDialog" به عنوان ProgID در فراخوانی به CreatObject یا با رها کردن یک شی CommonDialog روی یک فرم ایجاد کنید.
Methods
The CommonDialog object has these methods.
ImageFile object
Holds images transferred to your computer when you call Transfer or ShowTransfer. The ImageFile object is a container. It also supports image files through LoadFile. An ImageFile object can be created using
WIA.ImageFile" as the ProgID in a call to CreateObject"
Methods
The ImageFile object has these methods.
Properties
used as variable say ADFstatus that reads whether there is still a paper in the feeder and used this to create a while loop.(wiaScanner.Properties.Item("3087")). I then saved each scanned image separately, and it causes the ADF scanner to stop after each scan instead of scanning all papers at once.
("createobject("WIA.ImageFile
Indicates the file format of an image as String versions of GUIDs.
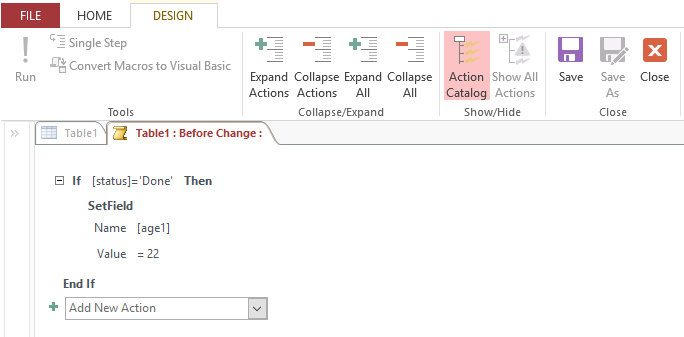
فیلتر در فرم با ماکرو SetFilter
ساخت باتن ( در نمای دیزاین ) ---> پراپرتی شیت ---> تب Event ---> کمبو باکس رویداد کلیک ---> Embedded Macro
طبق مثال زیر وقتی در تکست باکس ۲ از فرم جاری که Room هست آیدی مشخصی را تایپ کنید و روی باتنی که ساخته اید کلیک کنید چنانچه در منبع موجودباشد در فرم نمایش داده خواهد شد .
اگر این ماکرو ( که به فرم چسبیده و قابل ترجمه به VBA نیست ) قرار باشد سابفرمی در فرم را فیلتر نماید باید نام سابفرم هم برده شود فرضا MainForm فرم ۱ است و SubForm ساب ۱ نتیجتا ساختار نوشتاری آن بدین شکل خواهد بود
Forms!Form1!Sub1!Id=Forms!Form1!Text2
یکی از روش های حذف فیلتر در VBA
همانطور که مشخص است برای فیلتر کردن یا حذف فیلتر باید به فرم مراجعه کرد اگر در مثال زیر بعد از نام سابفرم پراپرتی فرم قید نشود با ارور مواجه خواهید شد چون سابفرم پراپرتی فیلتر ندارد اگر روی سابفرم کلیک کنید پراپرتی ها و رویدادهای آنرا مشاهده خواهید نمود لذا ذکر Form بعد از نام سابفرم الزامیست
()Private Sub Remove_Filter_Button_Click
Forms!frm_WO_Status_Form!subfrm_WO_Status_Form.Form.FilterOn = False
End Sub
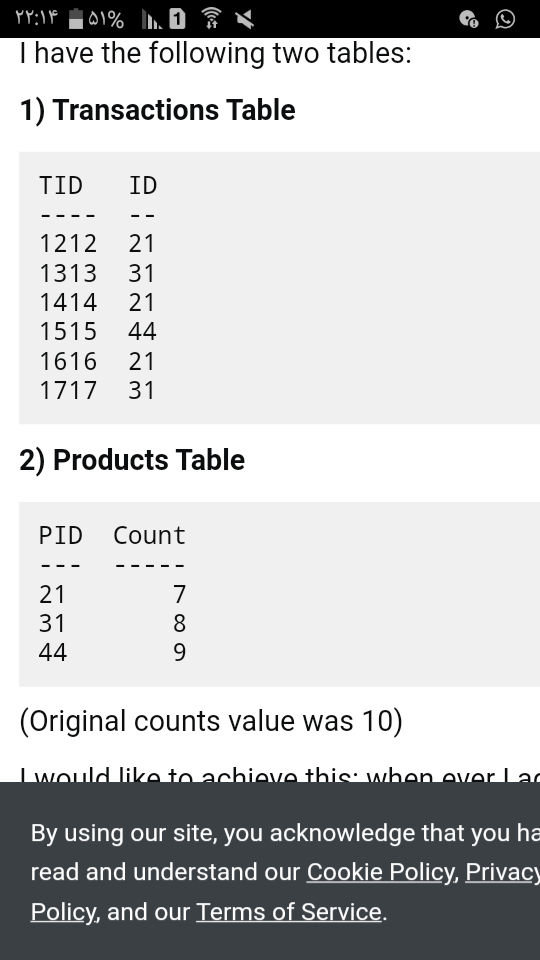
تعیین شماره رکورد در رکوردست
از صفر شروع میشه یا Zero-Based پس برای اینکه نشان دهد رکورد اول است باید عدد یک را به آن پراپرتی اضافه نمود
هنگامی که یک یا چند رکورد پیش از آن حذف می شود ، وضعیت یک رکورد تغییر می کند. همچنین هیچ تضمینی وجود ندارد که یک رکورد دارای موقعیت مطلق یکسانی باشدمثال زیر از خاصیت AbsolutePosition برای رهگیری ( دنبال کردن ) پیشرفت لوپ که تمام رکوردهای رکوردست را میشمرد استفاده می نماید
برگرفته شده از سایت آفیس